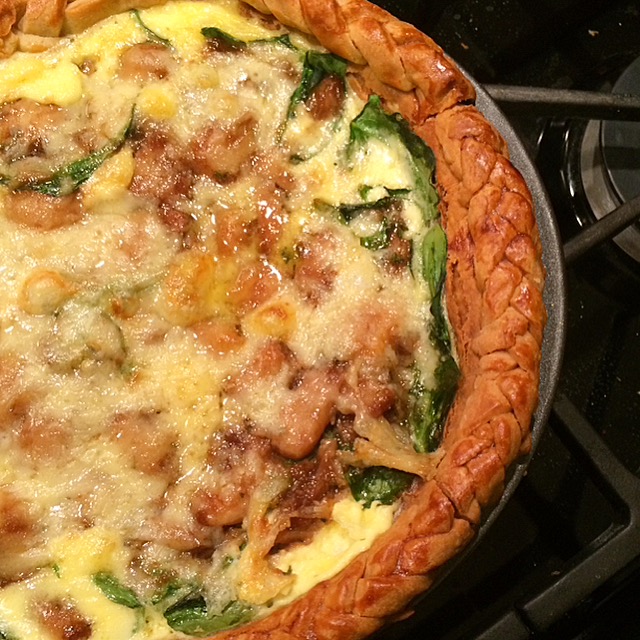
 As most of you know, 99.9% of the time, I create my own dishes. It’s very rare that I even see a recipe and decide to follow it step by step without changing something along the way. While most people find it comforting to follow a recipe, I just seem to find it stifling and frustrating. However, this weekend, I stepped outside of my comfort zone when I saw this incredible recipe for a caramelized garlic, spinach and cheddar tart in Bon Appétit magazine.
Instead of just sending you to the site to follow the recipe, I decided to share it on my blog for 3 reasons:
1) Their version is hard to follow for beginners. They tell you to peel 3 heads of garlic and don’t give any guidance on how to do that. If you did it all manually, you would be there for 2 hours and your hands would smell for weeks
2) Their cooking times are just plain wrong and you will get confused
3) You don’t need to make your pie dough from scratch (and it’s much easier not to)
All that said, I’m giving credit to them for the recipe, but re-writing it and changing the cooking times so that the average home cook can make this super simple and delicious tart.
Caramelized Garlic, Spinach & Cheddar Tart
Ingredients
- A Package of Refrigerated Pie Crust comes with 2
- Dried Beans or Ceramic Pie Weights
- 5 Eggs large
- 3 Heads of Garlic cloves peeled
- Kosher Salt
- 2 tbsp Olive Oil
- 1 tbsp Balsamic Vinegar
- 1 tbsp Pure Maple Syrup
- 1 tsp Rosemary fresh and chopped
- 1 tsp Thyme fresh and chopped
- Freshly Ground Black Pepper
- 2 cups White Cheddar Cheese
- 2 cups Baby Spinach stemmed
- ¾ cup Crème Fraîche
- ¾ cup Heavy Cream
Instructions
- Get your tart crust going! Pre-heat the oven to 350 degrees. Unwrap your two doughs. Place one the doughs in a pie dish. You want a little overhang, so if it is not big enough, roll it out with a rolling pin until it is.
- Take your other dough, square it off (by cutting off the tops ands sides), and cut it into even 1/4 inch strips. You will need about 15 strips.
- Now you need to braid those strips, 3 at a time. Once you finish a braid, place it on the edge of the pie and tuck or trim and over hang from the other dough. Keep doing this until you have a fully braided crust.
- Crack one egg, beat it and brush along braided part of pie.
- It’s time to pre-bake the crust. If you don’t (and just fill it with the custard and bake), it will be raw. To do this, place a piece of parchment paper in your pie and fill it with dried beans or pie weights. You want enough to fill the entire pie. Bake for 25 minutes or until crust is golden. Carefully remove pie weights and then bake for another 5-10 minutes until bottom is golden too.
- While crust is baking, peel your garlic. The easiest way to do this is to smash the entire head with the palm of your hand so that all the garlic cloves fall out. Then take those cloves and place them in a hard bowl (like pyrex) with a top and shake it like a polaroid picture. Shake for about 30 seconds, pull out the peeled cloves and shake again until all your garlic is peeled. Trust me, it works.
- Now it’s time to boil your garlic. In a medium saucepan, boil your garlic in salted water for about 6 minutes (until it starts to soften). Drain the garlic.
- Wipe saucepan dry and heat olive oil in pan over medium. Add the garlic and cook, stirring occasionally, until cloves start to turn golden brown, about 5 minutes. Add vinegar and 1 cup water and bring to a boil. Reduce heat and simmer until garlic is tender, 10–12 minutes.
- Once garlic is tender, add maple syrup, rosemary, and thyme, and season with salt and pepper. Cook, stirring occasionally, until liquid is syrupy and coats garlic, about 5 minutes.
- Scatter cheese 3/4 of the cheese over the bottom of the crust and top with spinach. Whisk crème fraîche, cream, and remaining eggs in a medium bowl; season with salt and pepper. Pour over spinach. Add garlic with any syrup. Add the rest of the cheese on top. Cover the edges of your pie with tin foil and bake until custard is set and golden brown in spots (about 35 minutes). Don’t forget to cover your edges or they will burn.
This recipe is a little more involved than usual, but worth every second! I recommend you read this recipe a few times and plan it all out in your head before tackling it. It will make it much easier!
Love always,
Erica


Oh baby, this looks good. I’m a sucker for garlic 🙂
Yaaah.l..thanks, #6 doesn’t work with that Pyrex shaking thing.